Wednesday, March 18, 2015

Magento 2 installation

How to install Magento 2 ?

Here is the following step need to be followed -


Step 1: Check system Configuration

  • Apache Version: 2.2 or 2.4 and Enable: mod_rewrite.mod_rewrite enables the server to perform URL rewriting.
  • PHP: 5.4.x where x = 11 or later  5.5.x and
  • Enable PHP Extension: PDO/MySQL,mbstring, mcrypt, mhash, simplexml, curl, gd2, ImageMagick 6.3.7 (or later) or both soap and
  • add xdebug.max_nesting_level=50000; at php.ini
  • MySQL Version : 5.6.x and upper
For installing magento 2 at wamp you need check above php setting then follow the below process:


Step 2: Download Magento2

Download Magento 2 from Github https://github.com/magento/magento2


Step 3: Download Composer.exe

Magento now using Composer to install the software. Composer enables us to manage the Magento system, extensions, and their dependencies. Composer provides you with the following advantages:
  • Enables you to reuse third-party libraries without bundling them with source code
  • Component-based architecture with robust dependency management
  • Magento dependencies to reduce extension conflicts and compatibility issues
  • Versioned dependencies
  • Semantic versioning
  • Supports PHP Framework Interoperability standard
  • We’ll have more information soon on how developers can use Composer to package extensions to distribute to Magento merchants and to other developers.
 From here you can download Composer.exe.

During installation process the installer request to you ,to select your php.exe which is located at
  • wamp - \wamp\bin\php\php5.5.12(Php version)\php.exe
  • xampp - \xampp\php\php.exe
After installing the composer.exe, you need to run the Command Prompt and reach to your Magento2 directory.

Now run the command - composer install

Above command will initialize the composer. And its time to restart your Apache Server.

Step 4: Now Install Magento 2

Now you are able to run the Magento 2 setup using browser. Following window will open during the installation process of Magento -

1) Agreement Window

2)Setup Description -


3) Setup Database -


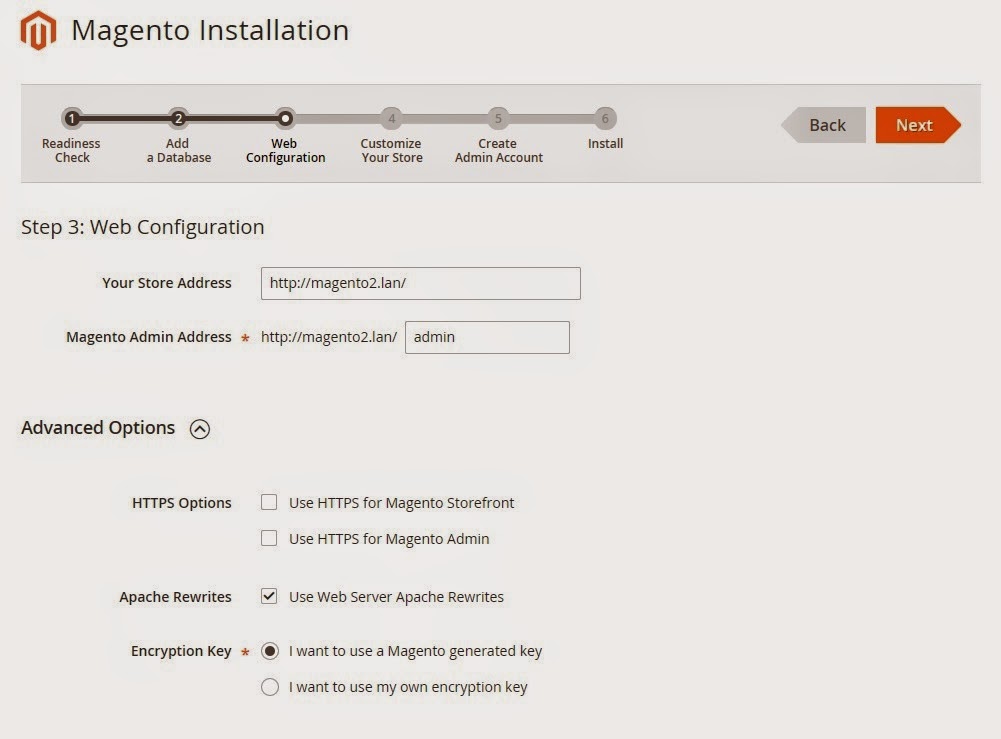
4)Web Configuration -


5) Customize Store Setting -


6) Setup Administration Details -


7) Installation Started -


7) Congratulations!

Still facing problem ? Contact Us - aforankur@hotmail.com

Note : This post written by Magento Certified Developer. For any help or assistance email at given address.


Sunday, March 15, 2015

Magento 2 | 10 most important features

Magento is a leading e-commerce solution and a huge platform for Merchants that enables them to sell their products online. This platform has more than 4 million downloads worldwide. And now we can witness the dawn of Magento 2. The new version of this platform brings lots of new features that have all the chances to play a key role in the growth of e-commerce market. In this post you can find 10 most important features of Magento 2.


Magento 2 - Better compatibility with other platforms

Magento 2 is based on Zend Framework and PHP 5.4, it also extends support for MSSQL, Oracle,  and other databases.

Magento 2 - The new level of flexibility

With a new structure of modules (component-based), the new Magento has a much better flexibility in terms of development. The high code coupling in combination with a component oriented structure allows developers to different components including CMS, customer, checkout, sales, catalog, and a lot more. In Magento 2, it is possible to disable or enable every component and at the same time to keep the code base clean.

Magento 2 - Testing-friendly environment

Magento 2 is 100% testing-friendly. It includes a flawless testing framework designed to perform: Static Tests, Performance Tests, Unit Tests, Legacy and Migration Tests, Integration Tests and JavaScript Unit Tests.

Magento 2 - Service Contracts

Service Contracts is another important feature of Magento 2, which is based on a set of different PHP Interfaces. The feature improves and simplifies the use of APIs for various modules. With Service Contracts, developers will get a new way of working with public API endpoints.

Magento 2 - The new file structure

Magento 2 comes with a completely new file structure. There is no base theme anymore and all the base views are in the module structure. Developers now face much less issues while developing custom Magento themes.

Magento 2 - Hassle-free upgrades and installation

Composer makes Magento 2 more friendly for an installation and updates. It is also possible to use a convenient format to upgrade to the latest Magento 2 version.

Magento 2 - Elimination of components and modules

Magento 2.0 provides advanced payment options. The new version of config.xml file is reduced by over 20%, as a result developers are able to offer customizable solutions within less amount of time.

Magento 2 - The concept of view

The complexity and overall development time in Magento 2 has been considerably reduced thanks to ‘the concept of view in the module’. The feature also enables developers to create the working view within no time.

Magento 2 - Better Security

Thanks to the changed directory structure, Magento 2 is more secure. There is a new directory – ‘pub’, which enables developers to protect the code from different security breaches.

Magento 2 - The Magento Community

The Magento development team is opened to the community of Magento coders, we can receive a seamless support for any issues related with Magento 2.


Thursday, March 6, 2014

Magento | Chrome Login Problem

Magento facing this issue due to Cookie's life time and some setting restrictions.

Here is two solutions you may try in order to solve such issue.
  • Change the cookie lifetime configuration.Go to backend -> Sytem -> Configuration -> Web -> Session and Cookie Management Set cookie lifetime to 86400 and save it .

Another way to solve it is -
Go to the following directory - app/code/core/Mage/Core/Model/Session/Abstract/ within your magento and open Varien.php file.

Find the following code -
$cookieParams = array(
    'lifetime' => $cookie->getLifetime(),
    'path'     => $cookie->getPath(),
    'domain'   => $cookie->getConfigDomain(),
    'secure'   => $cookie->isSecure(),
    'httponly' => $cookie->getHttponly()
);
and replace it with the following code -
$cookieParams = array(
    'lifetime' => $cookie->getLifetime(),
    'path'     => $cookie->getPath()
//  'domain'   => $cookie->getConfigDomain(),
//  'secure'   => $cookie->isSecure(),
//  'httponly' => $cookie->getHttponly()
); 
Hope it will work. Thanks. 

Tuesday, January 28, 2014

Optimizing Magento Performance

Enable Output Compression

This section will turn on the apache mod_deflate module, which compresses text, css, and javascript before it is sent to the browser. This results in a smaller download size. To enable, simply uncomment the appropriate lines so that it looks like the following:
<IfModule mod_deflate.c>

############################################
## enable apache served files compression
## http://developer.yahoo.com/performance/rules.html#gzip

    # Insert filter on all content
    SetOutputFilter DEFLATE
    # Insert filter on selected content types only
    AddOutputFilterByType DEFLATE text/html text/plain text/xml text/css text/javascript application/javascript

    # Netscape 4.x has some problems...
    BrowserMatch ^Mozilla/4 gzip-only-text/html

    # Netscape 4.06-4.08 have some more problems
    BrowserMatch ^Mozilla/4\.0[678] no-gzip

    # MSIE masquerades as Netscape, but it is fine
    BrowserMatch \bMSIE !no-gzip !gzip-only-text/html

    # Don't compress images
    SetEnvIfNoCase Request_URI \.(?:gif|jpe?g|png)$ no-gzip dont-vary

    # Make sure proxies don't deliver the wrong content
    Header append Vary User-Agent env=!dont-vary

</IfModule>

Enable Expire Headers

NOTE: This does not work on Litespeed servers.
Browsers use Expires headers to determine how long a page component can be cached. Static components, like images, should have far-future expires headers, but truthfully, all page components should have expires headers. To turn this feature on, just uncomment the appropriate line and add "ExpiresActive On" right above it. See below:
<IfModule mod_expires.c>

############################################
## Add default Expires header
## http://developer.yahoo.com/performance/rules.html#expires

    ExpiresActive On
    ExpiresDefault "access plus 1 year"

</IfModule>

Disable ETags

ETags are a way for browsers to validate cached components across subsequent visits. They can slow down a site served from a cluster if the cluster hasn't implemented them properly. It is best to just turn them off as follows:

############################################
## If running in cluster environment, uncomment this
## http://developer.yahoo.com/performance/rules.html#etags

    FileETag none

Combine CSS and JS Files

This feature reduces the number of HTTP requests. For versions earlier than 1.4.x, the Fooman_Speedster extension can be used instead.

WARNING WARNING: Combining CSS/JS when using CDN will cause CSS/JS to "break" until the CDN updates completely. It is recommended to perform this process at the beginning off-peak hours, to allow enough time for the "new" CSS/JS to reach the CDN.
  • In the Magento Admin, go to System > Configuration > Developer.
  • Under "Javascript Settings", change "Merge Javascript Files" to YES.
  • Under "CSS Settings", change "Merge CSS Files" to YES.
  • Clear the cache.

Enable Flat Catalog

Magento uses the EAV model to store customer and product data. This enables these objects to be incredibly extensible, but results in longer SQL queries and more reads. Enabling the Flat Catalog for Categories and Products merges product data into one table, thereby improving performance. Generally, all stores should enable Flat Catalog for Categories. Stores with over 1000 products should enable Flat Catalog for Products.
  • In the Magento Admin, go to System > Configuration > Catalog.
  • Under "Frontend", change "Use Flat Catalog Category" to YES.
  • Under "Frontend", change "Use Flat Catalog Product" to YES. (optional)
  • Clear the cache.

Enable the Magento Compiler

WARNING WARNING: Exercise caution when using extensions with the compiler, as some extensions may cause major issues for your site. It is recommended that you use as few extensions as possible to decrease the risk of compromising your site's stability.

Magento's application files are searched for in the following order:

  • app/code/local
  • app/code/community
  • app/code/core
  • lib
This search is performed for every page load, every time, resulting in a lot of filesystem reads. The Mage_Compiler reduces the number of reads by copying all of the application files to a single include directory. It also caches the most frequently used pages.
  • In the Magento Admin, go to System > Tools > Compilation.
  • Click "Run Compilation Process"

Magento Database Maintenance

Magento does many things well, but maintaining an efficient database is not one of them. Having a lot of products is a good reason to have a large database. Sadly, this isn't the only way your database can become big and sluggish. Maintaining the database through log cleaning can result in a dramatic improvement in site performance and latency. This guide explains how to clean up a Magento database that has grown too large for its own good.

NOTE: Before performing any operations on the database, please make a backup.

Log Cleaning

Magento maintains several tables for logging. These tables log things such as customer accesses and which products have been compared. Magento has a mechanism for cleaning these logs regularly, but unfortunately this feature is disabled by default and most customers do not turn it on. There are three ways to clean out these tables: via Log Cleaning in the Magento Admin, via log.php in the ../shell directory, and manually via phpMyAdmin or mysql client.

The following tables are managed by Magento's Log Cleaning function:

log_customer
log_visitor
log_visitor_info
log_url
log_url_info
log_quote
report_viewed_product_index
report_compared_product_index
report_event
catalog_compare_item

Log Cleaning via Admin
  • In the Magento Admin, go to System > Configuration.
  • In the left menu under Advanced click on System.
  • Under "Log Cleaning", change "Enable Log Cleaning" to YES and configure the Save Log for 15 days.

Code Level - Magento Optimization -

  • Calculating the size of an array on each iteration of a loop
  • SQL queries inside a loop
  • Loading the same model multiple times
  • Redundant data set utilization
  • Inefficient memory utilization

Friday, December 6, 2013

Magento | Get Product Minimum Sale Qty on Category View / Product List Page

Here is the following code snippet required to be added into your file where you want to display the Minimum Sale Quantity of the Product -

<?php $loadProduct = Mage::getModel('catalog/product')->load( $_product->getId() ); ?>
<?php echo $this->getMinimalQty($loadProduct); ?>

Paste and Enjoy!

Tuesday, December 3, 2013

Magento | Create Custom CSV and Download

Here is the following code we can use to Create a Custom CSV using some values and Download.

Currently, I am trying to download the csv for all products of Orders. Here is the Sample Code I am using in Controller given below -

$orders = Mage::getModel("sales/order")->getCollection();
// prepare CSV header
            $csv = '';
            $_columns = array(
                "Order Id",
                "Product Name",
                "Sku",
                "Price"
            );
            $data = array();
            // prepare CSV header...
            foreach ($_columns as $column) {
                $data[] = '"'.$column.'"';
            }
            $csv .= implode(',', $data)."\n";
            foreach ($orders as $order) {
                $items = $order->getAllItems();
                // echo "Order - ".$order->getId()."<br>";
                foreach ($items as $item) {
                    $loadProduct = Mage::getModel('catalog/product')->load($item->getProductId());
                    //prepare csv contents
                    $data = array();
                    $data[] = $loadProduct['id'];
                    $data[] = $loadProduct['name'];
                    $data[] = $loadProduct['sku'];
                    $data[] = $loadProduct['price'];
                    //...
                    $csv .= implode(',', $data)."\n";
                    //now $csv varaible has csv data as string
                }
            }
        }
        $this->_redirect('*/*/');
        $this->_prepareDownloadResponse('file.csv', $csv, 'text/csv'); 

Saturday, December 1, 2012

Magento - Get all Categories and Subcategories

It is not such a typical task. Here is the code to get all Categories and Subcategories in Magento -


<?php $_helper = Mage::helper('catalog/category') ?>
<?php $_categories = $_helper->getStoreCategories() ?>
<?php $currentCategory = Mage::registry('current_category') ?>
<?php if (count($_categories) > 0): ?>
<div id="tabs-1">
    <ul id="tree1">
        <?php foreach($_categories as $_category): ?>
            <li>
                    <input type="checkbox" value="<?php echo $_category->getId() ?>"><label><?php echo $_category->getName() ?></label>
                <?php $_category = Mage::getModel('catalog/category')->load($_category->getId()) ?>
                <?php $_subcategories = $_category->getChildrenCategories() ?>
                <?php if (count($_subcategories) > 0): ?>
                    <ul>
                        <?php foreach($_subcategories as $_subcategory): ?>
                            <li>
                                <input type="checkbox" value="<?php echo $_subcategory->getId() ?>"><label><?php echo $_subcategory->getName() ?></label>
<?php $_category = Mage::getModel('catalog/category')->load($_subcategory->getId()) ?>
               <?php $_subsubcategories = $_subcategory->getChildrenCategories() ?>
               <?php if (count($_subsubcategories) > 0): ?>
                   <ul>
                       <?php foreach($_subsubcategories as $_subsubcategory): ?>
                           <li>
                               <input type="checkbox" value="<?php echo $_subsubcategory->getId() ?>"><label><?php echo $_subsubcategory->getName() ?></label>
                           </li>
                       <?php endforeach; ?>
                   </ul>
               <?php endif; ?>

                            </li>
                        <?php endforeach; ?>
                    </ul>
                <?php endif; ?>
            </li>
        <?php endforeach; ?>
    </ul>
</div>
<?php endif; ?>

Enjoy!! :-)

Friday, November 30, 2012

Get Latitude and Longitude using Address in php

Here is the code snippet by which you can find the Latitude and Longitude using the Customer Address -


public function getLatLongArray($_Country, $_State)
{
$address = $_Country."+".$_State;

$_CountryName = Mage::app()->getLocale()->getCountryTranslation($_Country);

$url = "http://maps.google.com/maps/api/geocode/json?address=$address&sensor=false&region=$_CountryName";
$ch = curl_init();
curl_setopt($ch, CURLOPT_URL, $url);
curl_setopt($ch, CURLOPT_RETURNTRANSFER, 1);
curl_setopt($ch, CURLOPT_PROXYPORT, 3128);
curl_setopt($ch, CURLOPT_SSL_VERIFYHOST, 0);
curl_setopt($ch, CURLOPT_SSL_VERIFYPEER, 0);
$response = curl_exec($ch);
curl_close($ch);
$response_a = json_decode($response);
echo $lat = $response_a->results[0]->geometry->location->lat;
echo "<br />";
echo $long = $response_a->results[0]->geometry->location->lng;

return array(
'latitude' => $lat,
'longitude' => $long,
);
}

Enjoy!! :-)

Saturday, October 20, 2012

Magento : Get URLs

Here is the code to get base url, media url, store url, javascript url, images path etc in Magento.

To retrieve URL path in Static Block -

To get Skin URL
{{skin url='images/anx.jpg '}}
To get Media URL
{{media url='/anx.jpg'}}
To get Store URL
{{store url='anx.html'}}
To get Base URL
{{base url='storename/anx.html'}}

To Retrieve URL path in PHTML -
Note: In editing PHTML don't forget to enclode the following code with PHP tag

Not secure Skin URL:
<?php echo getSkinUrl('images/anx.jpg') ?> 
Secure Skin URL
<?php echo getSkinUrl('images/ anx.gif', array('_secure'=>true)) ?>
Get Current URL
$current_url = Mage::helper('core/url')->getCurrentUrl();
Get Home URL
$home_url = Mage::helper('core/url')->getHomeUrl();
Get Magento Media Url
 Mage::getBaseUrl(Mage_Core_Model_Store::URL_TYPE_LINK);
Get Magento Media Url
 Mage::getBaseUrl(Mage_Core_Model_Store::URL_TYPE_MEDIA);
Get Magento Skin Url
 Mage::getBaseUrl(Mage_Core_Model_Store::URL_TYPE_SKIN);
Get Magento Store Url
 Mage::getBaseUrl(Mage_Core_Model_Store::URL_TYPE_WEB);
Get Magento Js Url
Mage::getBaseUrl(Mage_Core_Model_Store::URL_TYPE_JS);

Thursday, September 27, 2012

Bestselling Products in Magento

To add a block into Home Page you need to  login into the Magento : CMS > Manage Pages > Home. Then add the following to the Content area:

{{block type=”catalog/product” show_total=”12″ template=”catalog/product/bestseller.phtml”}}

Now put the following code into catalog/product/bestseller.phtml -

   $visibility = array(
        Mage_Catalog_Model_Product_Visibility::VISIBILITY_BOTH,
        Mage_Catalog_Model_Product_Visibility::VISIBILITY_IN_CATALOG
  );

  $_productCollection = Mage::getResourceModel('reports/product_collection')
                      ->addAttributeToSelect('*')
                      ->addOrderedQty()
                      ->addAttributeToFilter('visibility', $visibility)
                      ->setOrder('ordered_qty', 'desc');
   $totalPerPage = ($this->show_total) ? $this->show_total : 6 ;
   $counter = 1;
Here you have the Best selling Product Collection. Now feel free to manage your Bestseller page with your own Style.